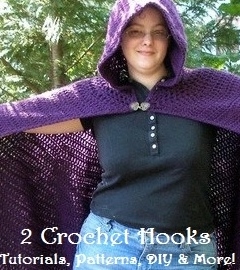
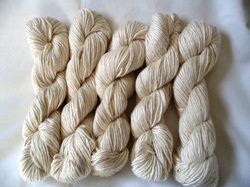
 I link to mizzKodak's shop Have you ever bought yarn you loved so much you were afraid to use? I was taking spinning lessons awhile back and was given a small sample of silk to practice on. I was in love at first touch. It was followed quickly by buying myself a large lot of silk yarn (blended a little with merino). It was so soft I could cry. I have to explain that I am a very textural person, I love faux fur (the soft kind) silk, satin, velvet especially. Anything soft.
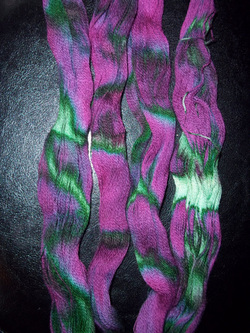 I link to the shop. GKMDesigns Being a sucker I found some more silk yarn online, 30% off, can't beat that. I just had to buy it. Especially since it was purple and green,my favorite color combination.
Now my dilema is this. I am terrified I am going to ruin it. Absurd I know, if I don't like the item just start over, right. And the enjoyment is in crocheting with it, right?
Please tell me I'm not alone. Please tell me someone out there has run into this same problem. And please, I would love suggestions. I am thinking a blanket...maybe a pillow? Or some soft supple gloves. But will the item get ruined? Sigh nothing lasts forever I suppose. I'll keep you posted on if I ever bite the bullet.
 Last time I made a bed for Layla using Bob's old quilt. Granddaughter Rami kindly donated a blanket she no longer needed so we used that to make two beds for the shelter.
First we cut the blanket in half and cut 2 pieces of batting a bit smaller.
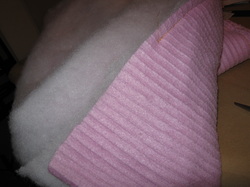 We made a layer sandwich with the cloth folded in half on the bottom and the batting on top. Rami's blanket was the same front and back so we didn't have to worry about which side was which but if you use a cloth with a right and wrong side you would put the two right sides together if sewing this way.
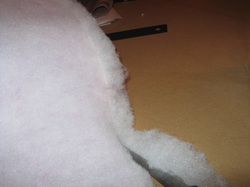 Next we carefully sewed a nice zig zag stitch around 2 and a half sides. (What? We are using a folded blanket so didn't need to sew one side). We started at one edge of the fold on the short side, sewed up it, across the long side and sewed half the short side. We trimmed the edges and then -
FLIP! We flipped it inside out, now the padding is in the middle and the blanket on the outside. Fold in and sew up the opening and done!
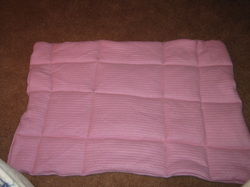 Oh forgot, almost done. Next to quilt. We originally bought a bunch of cloth scraps from the local Scrap Exchange in the interest of making quilts. We found we are not very good at it, so are using the cloth for other stuff. So as you can see, I tried a simple square pattern for the quilting here. Not so pretty but hopefully the dogs won't mind!!
Please support your local shelter! If you don't know if you have one google it!!
 So you are a crafter and you want to start selling online? I was too and I have found that there are more sites out there than I could ever hope to list stuff on. So this will not be a complete list as they come and go but a list of my top favorites.
 Etsy, of course. If you haven't heard of Etsy yet I am surprised.
Here is our shop as an example http://www.etsy.com/shop/2crochethooksbut I suggest you browse around and look at a lot of them. The majority of our online sales have come from here. It is easy to set up and manage which is always nice. They are also improving all the time and even have the shop stats (how many people have visited, purchased, ect) right on Etsy now where before you had to go to google analytics. The fees are reasonable and everyone is friendly and helpful. There is a wealth of information and plenty of people ready to give their 2 cents.
The biggest down side/complaint I have about Etsy is that it seems to be mostly made up of sellers. It needs more dedicated shoppers. I am more likely to sell a supply (i.e. pattern or tarn) than I am to sell a finished project. There is also the issue that I cannot update with my ipad, they have an app for buying and for looking at sold orders ect, but I cannot list new items with my ipad which makes me sad.
I suggest selling here as the cost for one listing for four months is just 20 cents, which makes it well worth trying for sure.
 Ebay has been around.... forever. Just kidding but sometimes it feels like it.
Ebay has never been my forte, mom has always done the Ebay stuff. My biggest complaint is unless you run a shop with buy it now prices or decent reserves then things have a tendency to sell cheaper than I'd like. I'm the type who'd rather wait for the perfect buyer who really values an item and is willing to pay what its worth than try to make a quick buck by letting people fight for it and see how low they can get it.
Ebay shop fees are reasonable and if you want to manage a shop on there with Buy it now prices or are willing to gamble with bidding then ebay is a great place. Just remember most people on there are looking to get second hand stuff as cheap as possible.
 Listia is my new favorite place to shop. Listia works based on points, sure you can buy points but when you start out you earn points for signing up and for learning the ropes. After that you earn points for selling stuff. The points don't pay for shipping so you are more likely to sell something with free shipping but then you have to cover shipping. I like to sell digital products, no shipping involved, but then you have to hope your buyer is honest and will say they got the item, so far so good.
Listia is much like ebay where you can end up getting less than you want. The highest you can set the starting point is 100 points so just be careful you don't list anything you aren't willing to part with at whatever amount they buy it at. The other point is you cannot cash out so you have to spend your points on listia. Not hard for me, I've been buying all sorts of amazing yarns on there. The hard part is resisting the urge to buy more points, so far so good.
There are no fees, in fact no money, involved at all. The only costs associated is with shipping and you can choose to charge shipping and have it covered or hope that it sells for enough points to make it worth shipping. It is very random how much you will make. Selling the same pattern I have made 700 points in one listing down to less than 100 in a listing. It depends on who wants it and how much they are willing to pay. As with any auction you need at least 2 interested parties.
 Yardsellr is an interesting and another place where people want cheap items. Yardsellr's biggest and greatest plus is that it is totally free for the lister. 100%, no kidding. Its a great place to list stuff.
Yardsellr buyers prefer no shipping (don't we all), especially on cheap items. This is because Yardsellr offers points for certain things and those points can be used to pay for the item (don't worry you still get cash when they pay) but not for the shipping.The best option is to increase the sale price of your item to cover the cost of shipping and offer free shipping and you will be fine.
There is no charge for listing items for sale and you can re-list for free as well. The listings don't last long so expect to spend some time and effort on this. They have greatly improved their re-listing with a new bulk re-listing button, just be careful about re-listing items you do not want to continue offering for sale. The site also has an etsy importer, you may or may not need to make adjustments to your items as they have a word limit and you may want to roll shipping into your prices.
 Bonanza is a nice site, its pretty and you have a shop where people can talk to you if you hang out in there. The items are free to list but you do pay a fair and nominal fee when someone buys something. You can sign up for a rush where they offer items at a discount and they promote to all their members. (The rush involves categories rather than individual shops so it is free to you and is optional if you don't like the idea of offering a discount.) The site also has an etsy importer but its very frustrating because you have to go into each item and tag it into the categories you want. If you are importing 100 items you have to go into each of those items and play with the tags (if anyone knows an easier way please let me know).
I have only sold 2 items on bonanza but I have not been as active with it as I could mainly because of the issue with re-tagging every item.
 Hyena Cart: we used hyena cart for awhile. It is a flat fee to list your items and if you don't pay the fee you can't mess with your listings but they will stay active for a month or so (don't remember exact amount) so you could have a month of down time if you don't have more listings. Generally we are adding new stuff all the time so we couldn't really let our membership lapse. No sales here but we only kept it a couple months. There is no importer so each item must be manually added. The listing designer is pretty unique and you can do some fun stuff with it. Its really great for customize-able options and you can add more options in there. Its less known so seemed to have less shoppers but it would be a great shop if you are doing advertising.
 Artfire. We listed a few things when they were free but now they have a charge. I think they have a good customer base but I don't know much about their site. If you have any info please let us know and we'll include it in here. We'll even include a shop link if you have one.
Let us know if you have a favorite place to sell or shop. As always any hints, tips, comments or concerns appreciated!
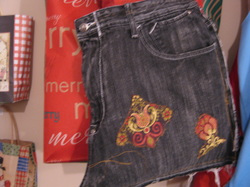
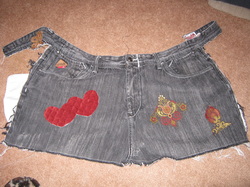 We had the front of a pair of jeans we were recycling into different crafted items left over. What to make? We decided to make a purse with it!
I picked a cool scrap cloth for the lining and cut a couple appliques from the material to add to the jeans.
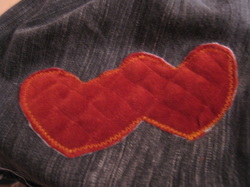 Then I picked a pretty red quilted scrap to make the handles. I cut out a double heart applique to add to the other side of the purse.
I pinned the appliques on and sloooooowly machine zig zagged around the edges to hold the appliques down.
Next I sewed the straps for the purse, adding a cord to help turn them back the right way. Man that was really hard!
 Assembly Time! I sewed the top of the jeans, the lining and the straps together. I sewed with a small tight straight stitch twice, a few centimeters apart and went back and forth over the ends of the straps several times to ensure they stay put.
 Next I sewed across the bottom because I wasn't too sure my machine could handle the side. I did a straight stitch across and then repeated with a more decorative stitch (I don't think you can tell in the picture so you'll have to trust me!).
Well...time to see if we can get up the side. Whew! It was tough, my machine really objected, but I was able to sew all the way up the side, stopping about 3 inches from the top. It was too thick there so I had to do it by hand. I did sew up the side twice, first with the straight stitch and then with a decorative one.
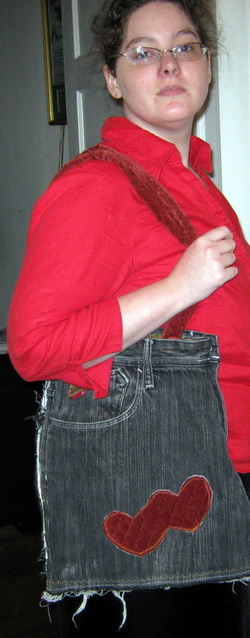 Discovered when I hand sewed the top why people use thimbles. I don't have one but found the handle of a seam ripper works good!
Here we go all finished. Jean pockets are totally useable and the inside is lined so pretty. The little appliques look great and really make it pop! We have this lovely item at the local Recyclique store, stop by!
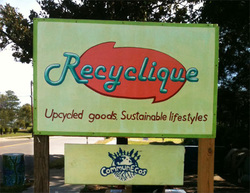 We have mentioned before about a local store called Recyclique (http://communecos.org) that opened sort of near my house. It's a great little place offering local upcycled/recycled crafts, vintage items, rain barrels, books and they offer classes on various eco-friendly subjects. Kristina and I have recently started showing some of our upcycled items there and volunteer there as well.
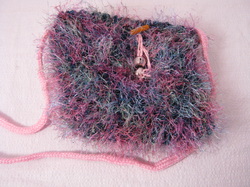 Sandy gave Kristina and me a couple of projects to do. Some of the items donated are not quite ready for sale and need a bit of a fix me up. In this case, someone had started a project with fun fur but didn't finish. Kristina made the cutest little fun fur purse but crocheting the fun fur into an open sided square.
 We added a strap and satin scrap for a lining, using items we found at the local Scrap Exchange (http://www.scrapexchange.org). Then we used some scrap yarn and a recycled toggle as a clasp and for a touch of whimsey, (like all the fur wasn't whimsical enough), we dangled some little bells on the clasp cord.
Too cute right?
 We did remember to take step by step pictures of the next project - A Hanging Planter from an upcycled scarf. Amazing idea huh? First I found a belt buckle to use at the top to hang the planter by. I ran it up to the center of the scarf, dangled it and thought, yeah this will work!
 Next I sewed about 5ish inches up from the bottom on both sides, then sewed the bottom edge together. Side came next, sewing them from the first sewn line down to the bottom edge. I used a tight zig zag and went back and forth a bit to help the sewing hold.
About this time I realized I meant to cut the main body of the scarf into strips.....a bit late now.
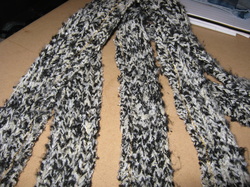 So to adjust I decided to sew across the scarf about 5 inches down from the 'center'. Then I sewed from that line down to the basket line about 3 inches in from both sides, basically making a large rectangle down the center of the scarf.
I cut across the bottom of the rectangle I made and then up the sides to the top. Now I had two strips that were just attached to the top of the scarf.
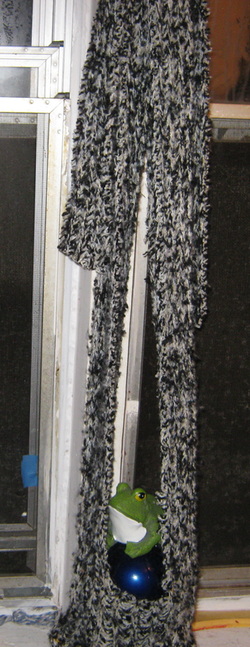 I wrapped the top area under the buckle a few times with the strips and then tied them into a nice knot. I decided to leave them dangling for now. Looks awesome if I say so myself! I didn't have a small plant so used my new froggy garden decoration. Wouldn't this look great with a sweet little plant? Come and visit Sandy and the rest of the gang at Recyclique and see what other cool and awesome upcycled items they have! And hey, if you are a local crafter, stop by and say Hi! and show us your stuff! http://yikeslink.blogspot.com/2009/04/wanted-crafters-artists-designing.html
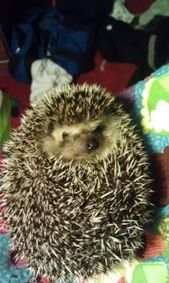
My son, David, has adopted a pet hedge hog named Quinn (short for Harley Quinn). So we are learning all about how to take care of hedge hogs.
 Hedge hogs are quite interesting. They are insectivores and in captivity they eat cat food......with very loud crunching. It was surprising how loud it was!
They also like to run run run in a wheel, large size, for hours on end, at night because they are nocturnal! And given the chance, they will run all over you, your room, your personal stuff, into very small places, etc.
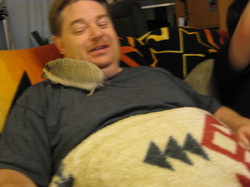
 While a hedgie is an unusual pet and has some quirks, they are cute and fun to socialize with. Here is Greg and David playing with her. David plays (or allows her to run all over him) about an hour or so every night. Supposedly this encourages the hedgie to bond to the human and allows the human get used to the prickles! lol
Being a crafty person I am already researching the fun things we can make for hedge hogs and I am sure to blog about it! Have a great one!
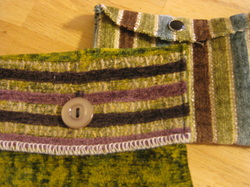
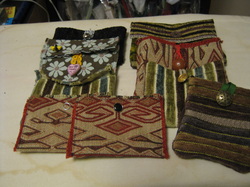 We have mentioned before that we have a TON of scrap cloth thanks to a big sale by our local scrap exchange (scrapexchange.org). I wanted to make a business card or credit card holder so thought I would use some of the pretty scraps. Here are some of my finished creations! (I can never make just one!)
 First I took a piece of cloth, my scissors and a business card. I placed the card (this card is from moo.com, check them out!) on the cloth and cut out a rectangle three times as big as the card and about a half inch bigger on each side. This size will give a nice flap to the pouch.
For some of the holders I cut the cloth twice the size of the card and a half inch extra around for a smaller pouch that has a top opening.
 For the three fold bags I folded the bag a bit more than half way, leaving the rest of the cloth for the flap cover. If you want to do a button, place a button hole in the center of the top flap.
Here is a three fold sample, fold up about a third or a bit more, sew the side seams, turn the project inside out (or I guess outside in!) Seams are in the inside, leaving a nice clean profile on the outside.
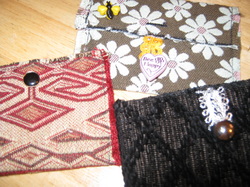 Or sew on the right side of the cloth, a bit in from the edges to give that too cool shabby fringe sides (red and daisy). For this style pick a cloth that fringes nice and go ahead and fuzz it out.
(To help fringe items I used a straw, needle and tape - I folded the straw in about half, then I pushed the needed thru the straw at the fold. Next I wrapped the back half of the needle and straw together. Easy to hold and use!)
 Add snaps, buttons or little wrap ties and any decorations you might desire and you are finished! Quick, fun and eco friendly craft.
P.S. I watched a couple videos and read the book but still could not figure out the button hole foot on the sewing machine - if you have any hints or tips pls send!
 Hats are the hot thing (no pun intended lol) to wear for warmth, for 'coolness', and best of all, for showing off your individual personality. Hats come in all sizes, shapes and with add-ons like ears, flowers, fins and more. Basically your imagination is the limit!
Here Kristina models the Cat eared beanie. This hat can be done in your choice of colors.
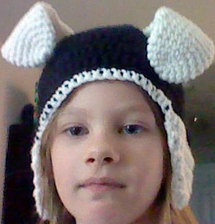 This lovely little girl modeling our puppy dog eared hat is Rami, Kristina's daughter and my granddaughter. As you can tell, she gets her good looks from her grammy! :)
This particular hat has ear flaps but you can get puppy ears on a beanie and in your choice of colors.
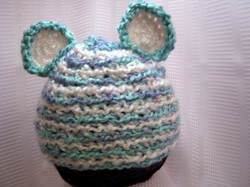 This is a fun hat with bear ears and stripes. We have this style hat in several colors. When it is made in white it looks just like a polar bear!! Try it in fun colors or add in an applique flower or other fun item.
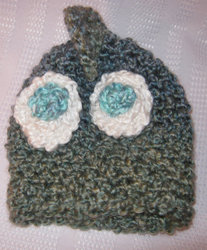 This is an adorable hat that has created quite a buzz here at our local craft market. You really have to see it in person to get the full affect but it's a sea monster!! Kristina came up with this pattern from her own wellspring of creativity. So adorable, soft and squishy and, of course, totally able to be customized in your colors!
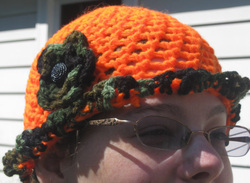 You don't have to have ears to personalize a hat. This hat is a great example done up in blaze orange and camo varigated yarn for a fun and feminine way to show off some colors typically used for guys. Add in the cute flower and the sparkly button just for a touch of whimsey!
We would be glad to personalize a hat for you! Click this link to special order a hat or send us an email with your suggestions. http://www.etsy.com/listing/82329660/custom-crochet-hat-beanie-tam
|