Picture
I've gotten a lot of requests for baby booties and socks and such. So far we had not made any because I can never seem to get 2 items to turn out exactly the same. I decided to throw caution to the wind and make a pair or two but had no idea about sizing ect so to be safe I looked up a pattern. Gasp. I know I rarely use patterns as I prefer to make my own but when you make an item for the first time its good to have one. 


A couple pairs of the jeans I have in my stash belong to my granddaughter, Rami. These pants are in good shape but a bit short (why do those kids continue to grow!!), so why not make a skirt! she loves loooonnnngggg skirts so I figure I will make a small hem.
Picture
Kristina helped out by ripping the inside seam out for me.

I then used some fabric I had here to make the panel inserts by laying some paper between the legs and marking out the opening.


At long last, the post I promised with several easy afghan edgings. I apologize that I didn’t get this posted sooner!

When edging an afghan you can choose to continue in the same color or add a new color. If you are continuing in the same color you can start the edging at your last stitch from the previous row or, if you are close to the corner, you can choose to slip stitch to the corner and start there. If you are doing an edging that requires a certain count, I will typically start in the corner. If you are adding a new color for the edge, add in the corner.

In addition, unless the edging has a specific way to do the corner then some suggestions are (depending on the afghan style pick what works best): Three ss or dc in the center corner stitch or one – three sc or dc with a chain 2 and two or three sc/dc in the corner stitch. Follow your pattern or follow your imagination, whatever works best for you. I also recommend that you do a foundation row of sc or dc before you start your edge for a cleaner finish.

These first three edges or trims are designed to be close to the afghan because when I first started making afghans I mainly crocheted premie comfort afghans. Due to the small size of these premature babies, it is recommended not to have holes or dangling parts.
Picture
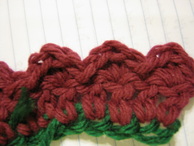
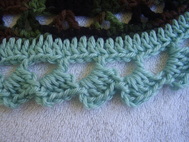
Two simple yet elegant edges for afghans are variations on the shell stitch:

Small shell: ss in first ch, (sc, dc, sc) in next, ss in next ch, repeat around.


Picture
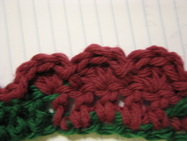
Large shell: ss in first 2 ch, 3dc in next ch, ss in next 2 ch,  3dc in next ch, repeat around.

Another variation is to make the shell with (dc, triple, dc) (not pictured)


Picture
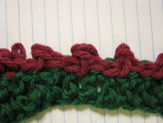
Another easy but attractive edging, especially for masculine blankets, is: ss first ch, in the next ch (ss, dc, ss), ss in the next ch and repeat around (if you have a hard time completing the dc you can just chain 2 or 3 – see which you like best!). This makes a fun bumpy edge that is simple yet pleasing to the eye and touch.


Picture
For a more advanced and unusual trim try the block edge – I loved it when I first saw this pattern and it took a few tries to master it so don’t be discouraged if you don’t catch on right away! Have at least one if not two rows of sc before you do this edge.

Chain 4, *skip next 3 sts, 1 trc in next st, 3 ch, 4 dc around stem of trc just worked, rep from * to end.

If you have any questions, comments or concerns please let us know. If you have a favorite edge or trim stitch please share! Thanks for reading and enjoy your day!

 
Ok trying to come up with 101 creative ways to reuse blue jeans! Here is my way #2 which is totally cute, functional and makes a great gift -
Picture
a Tea Wallet! so neat and easy to make.
Cut 2 squares of jean and two of the lining (pocket), a button and piece of ribbon. Easily customizable and each can be totally unique. Change the size a bit for a credit card wallet.


Picture
Hi! I was slack, I'm sorry, but I'm back. It seems the days are zipping by. Doesn't it seem weird that now the days are longer I seem loose track of them easier, I guess I'm taking all this beautiful day light for granted. Anyway, I got some beautiful yarn awhile back, its Shirekat Glitzy Glam Vamp, quite a mouthful and I think I missed a word or two in there somewhere even. I got lace weight and it was the first time I have played with lace weight other than the baby yarn, but I don't think that counts. 

Picture
I had no plans for this yarn when I bought it I just loved the pink and black color scheme. After sitting and staring at it awhile the idea for fingerless gloves formed in my head. So... I made them. This is actually the second pair of gloves I made, the first were yellow and black stripe, so I experimented a bit and added some shells. I think I made them a little too big ;_; but I guess I can always try again, my arms are small so my guess was off. If you make fingerless gloves make sure you make the top part a little tight on your arm, thats what holds it up. All the patterns I read just go straight down but I decreased in then increased back out. It makes them look a little weird off the arm and probably would have been an unnecessary step had I made them tight enough to fit. 

Picture


Let me know what you think!

I hope to make more fingerless gloves in the future so if you have any advice I'd love to hear it. 

 
Picture
Today was cupcake day! We've been meaning to make cupcakes for awhile and we finally got around to it. Its white cake but the icing is... BUBBLEGUM! How cool is that?

Picture
Each kid got to ice their own and then cover them with sprinkles. Bob didn't do too bad with the icing but I did help clean it up at the end. The sprinkle job was all his though. 

Picture
These were the final project minus the 4 we ate as we were icing, lol. The bubble gum icing was pretty fun to make (Mix ins), fun to frost with, and equally fun to eat. It didn't taste too shabby. 

The kids did all the mixing, and helped with the pouring, they iced theirs and covered them with sprinkles. They had lots of fun!

Please share some fun you are having, we would love to hear about it!
Thanks for reading, Kristina

    Loading

    Subscribe to our mailing list

    * indicates required
    Follow on Bloglovin
    We are making the move to Word Press with the help of our friend Janine (J9)
    J9 Designs

    Authors

    Millie and Kristina
    Mother and Daughter

    Blogging about crochet, crafts, upcycling and having tons of fun :)

    Click here to see all of our free and paid patterns
    Picture
    Click to Enter Thirty One Giveaway Portion of sales to benefit Hope Animal Rescue!
    Picture
    Click to Enter!
    Picture
    Click to enter!
    Picture
    Click to Enter!

    Categories

    All
    101 Jeans
    A Day In The Life
    Charity
    Crafting Fun
    Free Pattern/tutorial
    Giveaway
    Link Parties
    Organization
    Review

    Awesome Sponsors & Button Swaps
 photo 8d0e0b89-77a5-40db-b80f-bc91e6107a60_zps9bd793a4.jpg
Nugget On A Budget
Better Blogger Network
Holiday Shopping/
Affiliate Links
teeturtle tshirt
100% of profits provide clean water and education - Three Avocados

Archives

November 2013
October 2013
September 2013
August 2013
July 2013
June 2013
May 2013
April 2013
March 2013
February 2013
January 2013
December 2012
November 2012
October 2012
September 2012
August 2012
July 2012
June 2012
May 2012
April 2012
March 2012
February 2012
January 2012
December 2011
November 2011
October 2011

Knitting Supplies at Craftsy.com