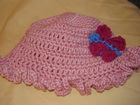
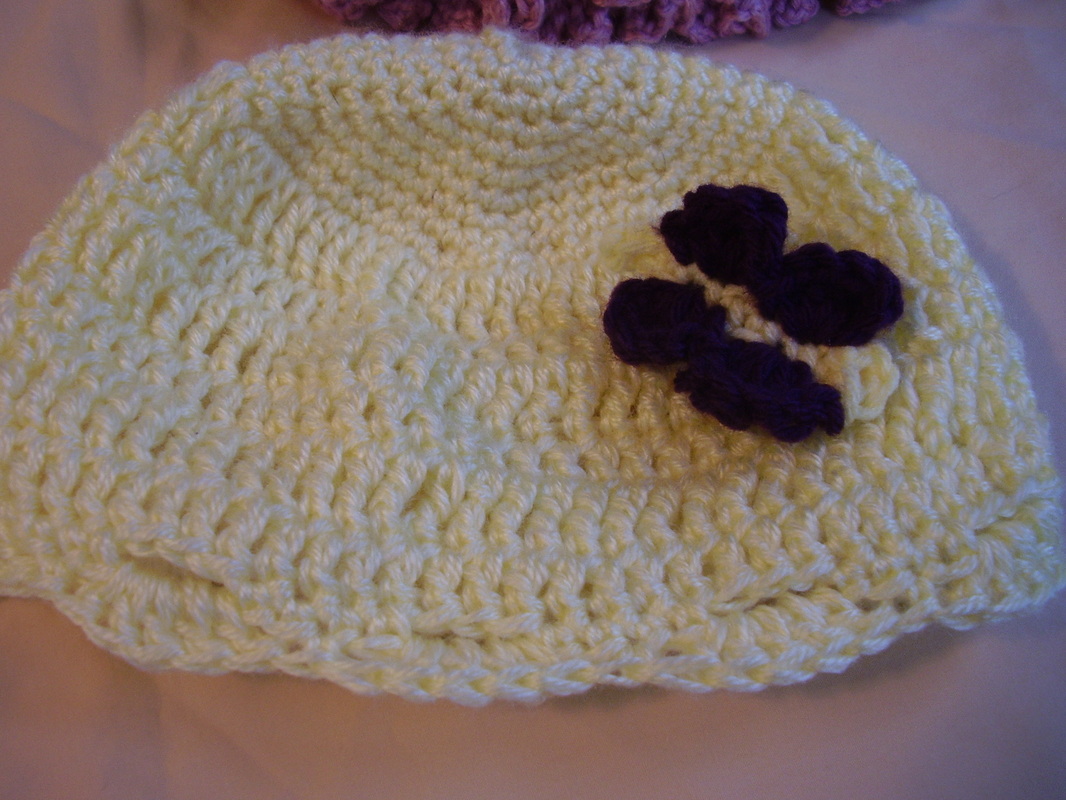
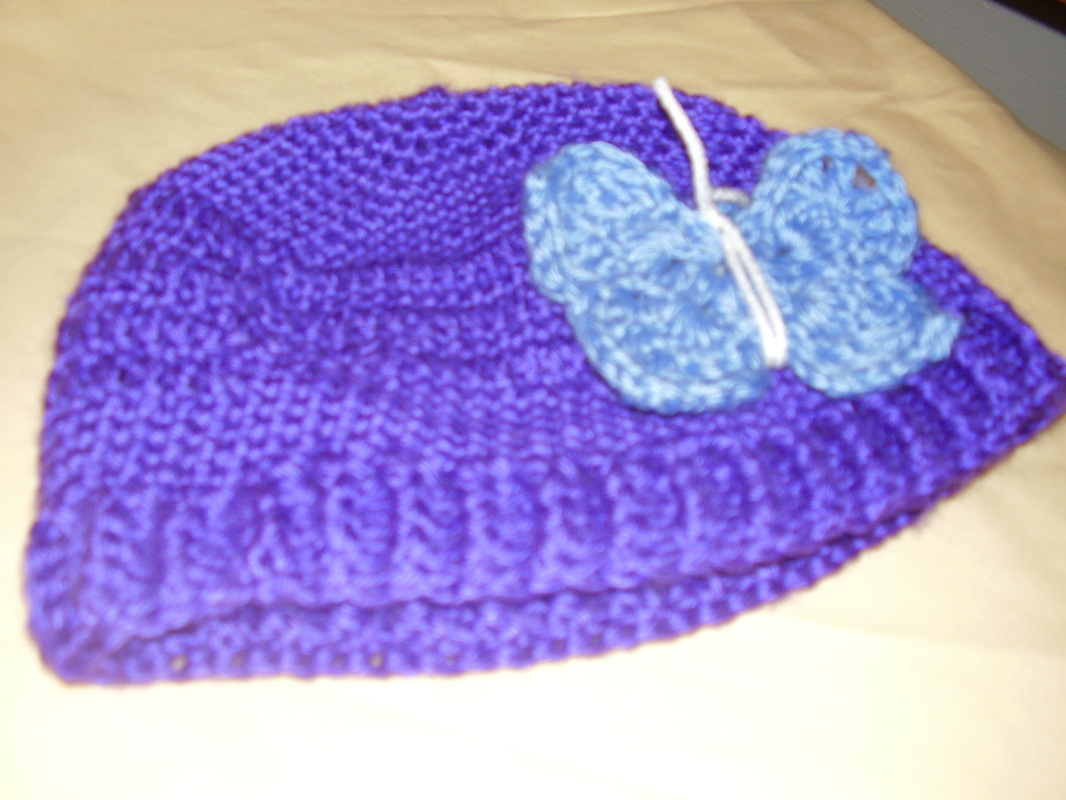
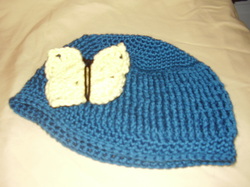
I have a friend from work who has 4 grand daughters and she wanted hats for each child to give as a Christmas gift. Her only stipulation, she wanted them all to be unique. I made each of the four hats a different color and style and for a touch of fun, added a different butterfly for each hat. My friend and her granddaughters loved their hats! Today, I am going to share the pattern for the third hat and butterfly with you as the hat is my own design and a bit different than your usual hat.
|
|

Pattern: Use worsted weight yarn, hook of your choice. Make a slip knot or your ring; however you prefer to start your hat.
1. 6 SC in the ring
2. Single crochet twice in each single crochet around
3. Single crochet twice in the first stitch and once in the next stitch. Repeat alternating between two sc and one sc until you get back to your stitch marker.
Note: You should always end on a single stitch after the initial row of two in each, if you do not you miscounted somewhere. When I first started I miscounted often, just pull out to where you miscounted and continue your pattern.
4. Single crochet twice in the first single crochet and single crochet once in the next two single crochet, as always repeat around ending on one at the stitch marker.
5. Single crochet twice in the first single crochet and single crochet once in the next three single crochet, continue around ending on one at the stitch marker.
6. Continue in established pattern until the correct size achieved. At this point you should begin to see the pattern. This is where we are increasing to get a flat foundation for our head.

Basic sizes: The following chart is basic sizes. Measure from one side of your circle to the other to get your diameter. The height will be measured when you are done (or think you are) by measuring from the top to the bottom.
If you can get the head circumference (around the forehead) of the future hat owner you can determine the diameter. Your starting circle, when you stop increasing, will be need to be about an inch smaller than the diameter of the person’s head because as you work down the hat will widen naturally.
Preemie 1-3 lbs is 2.5 inches in diameter 3.5" tall pre brim Preemie 4-5 lbs is 3 inches in diameter 4" tall pre brim Preemie 5.5-6 lbs is 3.5 inches in diameter 5” in height pre brim 0-3 months is 4 inches in diameter 6 in height
3-6 months is 5 inches in diameter and 7 inches in height 6-12 months is 5.5 inches in diameter and 7.5 in height
Toddler to preschooler 12mo-3yrs: 6 inches in diameter and 8” inches in height 3-10 yrs: 6.5 in diameter and 8.5 in height
Preteen- teen: 7 in diameter and 9 in height Woman: 7.5 in diameter and 11 in height Man: 8 in diameter and 11-11.5 in height
I used http://www.bevscountrycottage.com/size-chart.html to learn sizes but her circumference was confusing to me which is why I switched to diameter as above. I didn’t realize until charting that it’s only about .5 or so in between sizes.
 click for a video tutorial
 Back to the hat:
1. Do one row even of DC around
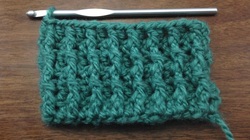
2. After your first row of regular DC you can start doing the FPDC as described above. Often times the FPDC is alternated with the BPDC but I rather liked the look of all FPDCs together.
To do a FPDC yarn over, put the hook through one side of the DC of the previous row and out the other so the hook is behind the DC and pushing it out a little. Grab the yarn with the hook and pull it through behind the DC, finish it off like a regular DC.
3. Stop an inch or two (you can see in the first pic it is 4 rows) before you want the hat to end and switch to sc for a nice trim until you reach desired length.
As always fasten off and wear. I suggest you try any hat you make on before you fasten it off so that you can adjust as necessary, I even try it on now and then as I go so I know if it is wrong before I get to the end.
1. Do one row even of DC around
2. After your first row of regular DC you can start doing the FPDC as described above. Often times the FPDC is alternated with the BPDC but I rather liked the look of all FPDCs together.
To do a FPDC yarn over, put the hook through one side of the DC of the previous row and out the other so the hook is behind the DC and pushing it out a little. Grab the yarn with the hook and pull it through behind the DC, finish it off like a regular DC.
3. Stop an inch or two (you can see in the first pic it is 4 rows) before you want the hat to end and switch to sc for a nice trim until you reach desired length.
As always fasten off and wear. I suggest you try any hat you make on before you fasten it off so that you can adjust as necessary, I even try it on now and then as I go so I know if it is wrong before I get to the end.
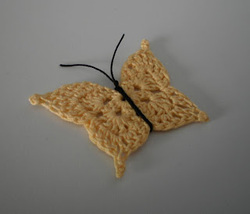
The butterfly pictured on the hat was made from a pattern found on
http://dishclothdiaries.blogspot.com/2010/06/2-d-butterfly.html
It is a super cute and realistic butterfly.
Thanks for reading! Hope you go out today and have a little fun!
http://dishclothdiaries.blogspot.com/2010/06/2-d-butterfly.html
It is a super cute and realistic butterfly.
Thanks for reading! Hope you go out today and have a little fun!
Link ups:
Sunday: Sunday Show Off /Bouquet of Talent Sunday / Nifty Thrifty Sunday / Sundae Scoop / Submarine Sunday / Not Bad Sundays / Suburbs Mama Sunday / Flamingo Toes / Let’s Get Social Sunday
Monday: Frugal Crafty Home / Market Yourself Monday / Mix It Up Monday / More the Merrier Monday / Motivate Me Monday / Masterpiece Monday
Tuesday: Made By Me Tuesday / Handmade Tuesday / Tuesday’s Treasures / Nifty Thrifty Tuesday / Facebook Frenzy Tuesday / Time To Sparkle / Terrific Tuesdays
Wednesday: Homemaking Wednesday / Wow Me Wednesday / Wonderful Wednesday / Real Fun Features / What I Whipped Up Wednesday / We Did It Wednesday
Thursday: Create It Thursday /Party Time Thursday / Thursday Hop / Blog Stalking Thursday /Share Your Cup Thursday / Think Tank Thursday / Bloom Thursday / Blog Strut Peacock Style
Friday: Friday Chaos / Show & Tell Friday / Crafty Friday / Show Off Friday / Friday Favorites / Anything Goes / Inspire Me Please / Craft Frenzy Friday
Saturday: Be Diff Act Normal / Serenity You Saturday / It’s Overflowing Saturday / Saturday Sparks