
The Creeper! If you play minecraft, know anyone who plays minecraft, or have even just heard of minecraft, then you know what a creeper is. If you have no clue then... its an annoying monster in a game called minecraft. It sneaks up on you and kills you when you least expect it. it is utterly terrifying to suddenly hear a hissssss behind you or turn and run into one face to face! This unique creature has become the Icon of Minecraft - most favorite and most hated!
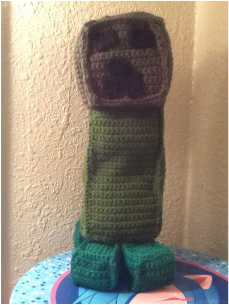
Someone asked me to make a stuffed creeper for Christmas. I got started right away. I scrounged through my yarn pile and found a couple shades of green scraps. I figured if it was multiple shades of green all the better considering the splotchy look of the picture.
Someone asked me to make a stuffed creeper for Christmas. I got started right away. I scrounged through my yarn pile and found a couple shades of green scraps. I figured if it was multiple shades of green all the better considering the splotchy look of the picture.
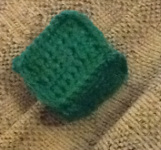
For the head I started with 6 squares of 15 stitches by 15 rows and . At first I whip stitched them together into a cube but I actually figured out it is better to single crochet them together to get a more square look.
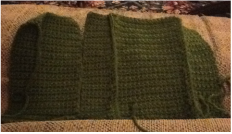
Next I made 2 rectangles 15 stitches by 36 rows for the front and back of the body and 2 rectangles 8 stitches by 36 rows for the sides of the body. I only needed 1 rectangle 6 stitches by 9 rows for the bottom of the body as the top will be sewn directly to the head. I single crocheted the pieces together into a rectangle and then whip stitched it to the head.
I then debated on whether to do two long rectangles as in the first picture or not as I was thinking they must walk so I looked up a video of their walk animation. Watching the video it is very clear that they have 4 little square feet so I made 24 squares of 7 stitches by 7 rows and sewed them all together to make 4 little cubes. I then sewed the 4 little squares to the legs and there you go, feet.

As you can see his face is squares too so I did 2 squares of 4 stitches by 4 rows for eyes and sewed them in place. I was confused about the face from the top picture so I looked up a face specific picture and found a few that clearly showed he had an odd looking mouth so I fiddled with ways of increasing to get the shape but decided the best way was just to make 2 separate pieces as follows. Top of the mouth: 3 rows of 4sc. 2 rows of 8 sc. Then 2 DC, ch 2 and SS in same stitch as 2nd DC. ss in next 5 sc, ch 2 and DC in same stitch and next stitch. Repeat one more time but ch 4 instead of 2. In hindsight sewing the face on before sewing the head together would have been a good idea. Anyway all done. Hope you like him.
Go out and have a creeper free day!
Thanks for reading!
Linked at Tutorial Thursday: http://marigoldsloft.blogspot.com/
Go out and have a creeper free day!
Thanks for reading!
Linked at Tutorial Thursday: http://marigoldsloft.blogspot.com/