Organization with a craft room
Ok so let’s say you are one of the lucky few who have a room dedicated to your craft. Maybe your kids moved out and you have an old bedroom, maybe you always had an extra room, maybe you were so daring as to add on an extra room just for crafting, perhaps a tower room with a view. Maybe I’m just thinking wishfully about that last one. Whatever the case may be you are standing in an empty room (or maybe not so empty) and wondering where to start.
Step 1: Assess your needs. What crafts do you do? Do you crochet or knit, do you sew, do you scrapbook, do you bead? Get a piece of paper and list what crafts you do, what supplies you store for said crafts and approximately how much space they take up.
Example: Our craft room:
Crochet/Knit: Yarn of varying weights and colors, hooks, misc. other supplies
Sewing: Cloth of varying sizes, sewing machine, ribbons and elastic and other various supplies
That’s pretty much all we have supplies for right now but your list may be different.
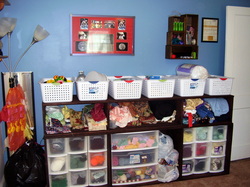
Step 2: Assess what would be the best form of storage for your supplies. Scrapbooking is a whole world on its own that I don’t play with but it has many organization options that are just for it such as paper storage and such. For us Yarn seemed best kept in those plastic drawers that are clear so you can see the colors. We keep them color organized, each drawer has a different set of colors so they are easy to find. The cloth we felt would be best folded up and put in a way that we could see all the edges but not covered so we could easily reach over and touch them to feel their weight and texture. For the miscellaneous stuff we decided to go for something simple, baskets to hold our supplies. Also think about work space when you do this, do you need a sewing table and a comfy chair? Do you need an easel? Do you need a couple tables so you can stretch out? Whatever you need fill it in on your list or make a new one.
Example:
Yarn: Plastic drawers
Cloth: Some sort of shelf or open container
Misc. supplies: Baskets
At least one table, preferably 2 (there are 2 of us after all)
And a photo area (very important for us).
We also needed somewhere to store finished projects ready for sale.
Step 3: Organize what you have. Some of it may be no good but you are hanging on to it because they are your supplies. We had some yarn that looked nasty, either it got dirty or it was so rough that it would never make a good project but it was still really hard to get rid of them. Cull whatever you don’t need, don’t want,or just will not work for you anymore such as damaged goods, ugly goods, or generally unusable items and scraps. If it’s still useable but you don’t like it sometimes schools will take items for crafting but ask first before you donate. Now that you have exactly what you want to store, how many storage solutions will you need? Think about storing what you have now with some room to grow if you think you will collect more in the future (if you are like us, you will). It’s a good idea to do some measuring before you go shopping and I always suggest using what you already have on hand whenever possible. Do you already have a craft table? Do you already have some storage (likely you have some to start with or where else would your stuff be?) that you can use or repurpose?
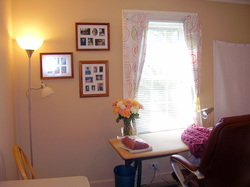
If you can (not all of us think well this way) draw a map of your room as much to scale as you can and fill in your dream room. Map out where your work area will go first as it is actually the most important. If you need a table and there is nowhere to put it because of all the drawers and cabinets then you will not want to work in there. It’s also great to give it the prime realty like in front of the window, for example. Around your work area(s) map where you want the previously listed storage options to go. If you are pretty close to scale you should be able to figure out how many of each you can store. Begin arranging what you have (if you need to paint or re-do the floors do that before you move stuff in of course) and then fill in what you want to get when you get it. If you are like us you are on a tight budget and may not be able to get it all at once. If you are handy or have a handy person around you can build some storage options like we did. Lastly don’t forget to personalize your room. Put in decorations, inspirations, pictures and such.
Step 4: Most important! Sit in your new craft area. Look around, maybe work on a project. Do you feel comfortable? Do you feel crowded? Is it too dark, too bright? As you work on your project are you able to find what you need? Are your most used items close at hand? A small basket for often used items is a good idea, one with a handle so you can carry it with you or a tote bag so you can pick it up and go. If you don’t feel comfortable fix any issues that come up. It may take a few tries before you get it perfect but don’t get discouraged. You may even find that your needs will change as you grow as a crafter. Just re-assess your needs and adjust accordingly.
I hope this helped you organize your thoughts for your craft room; don’t forget to put it in use. It won’t do any good if you don’t actually do it. Tune in same day next week to see how our room is organized.
Ok so let’s say you are one of the lucky few who have a room dedicated to your craft. Maybe your kids moved out and you have an old bedroom, maybe you always had an extra room, maybe you were so daring as to add on an extra room just for crafting, perhaps a tower room with a view. Maybe I’m just thinking wishfully about that last one. Whatever the case may be you are standing in an empty room (or maybe not so empty) and wondering where to start.
Step 1: Assess your needs. What crafts do you do? Do you crochet or knit, do you sew, do you scrapbook, do you bead? Get a piece of paper and list what crafts you do, what supplies you store for said crafts and approximately how much space they take up.
Example: Our craft room:
Crochet/Knit: Yarn of varying weights and colors, hooks, misc. other supplies
Sewing: Cloth of varying sizes, sewing machine, ribbons and elastic and other various supplies
That’s pretty much all we have supplies for right now but your list may be different.
Step 2: Assess what would be the best form of storage for your supplies. Scrapbooking is a whole world on its own that I don’t play with but it has many organization options that are just for it such as paper storage and such. For us Yarn seemed best kept in those plastic drawers that are clear so you can see the colors. We keep them color organized, each drawer has a different set of colors so they are easy to find. The cloth we felt would be best folded up and put in a way that we could see all the edges but not covered so we could easily reach over and touch them to feel their weight and texture. For the miscellaneous stuff we decided to go for something simple, baskets to hold our supplies. Also think about work space when you do this, do you need a sewing table and a comfy chair? Do you need an easel? Do you need a couple tables so you can stretch out? Whatever you need fill it in on your list or make a new one.
Example:
Yarn: Plastic drawers
Cloth: Some sort of shelf or open container
Misc. supplies: Baskets
At least one table, preferably 2 (there are 2 of us after all)
And a photo area (very important for us).
We also needed somewhere to store finished projects ready for sale.
Step 3: Organize what you have. Some of it may be no good but you are hanging on to it because they are your supplies. We had some yarn that looked nasty, either it got dirty or it was so rough that it would never make a good project but it was still really hard to get rid of them. Cull whatever you don’t need, don’t want,or just will not work for you anymore such as damaged goods, ugly goods, or generally unusable items and scraps. If it’s still useable but you don’t like it sometimes schools will take items for crafting but ask first before you donate. Now that you have exactly what you want to store, how many storage solutions will you need? Think about storing what you have now with some room to grow if you think you will collect more in the future (if you are like us, you will). It’s a good idea to do some measuring before you go shopping and I always suggest using what you already have on hand whenever possible. Do you already have a craft table? Do you already have some storage (likely you have some to start with or where else would your stuff be?) that you can use or repurpose?
If you can (not all of us think well this way) draw a map of your room as much to scale as you can and fill in your dream room. Map out where your work area will go first as it is actually the most important. If you need a table and there is nowhere to put it because of all the drawers and cabinets then you will not want to work in there. It’s also great to give it the prime realty like in front of the window, for example. Around your work area(s) map where you want the previously listed storage options to go. If you are pretty close to scale you should be able to figure out how many of each you can store. Begin arranging what you have (if you need to paint or re-do the floors do that before you move stuff in of course) and then fill in what you want to get when you get it. If you are like us you are on a tight budget and may not be able to get it all at once. If you are handy or have a handy person around you can build some storage options like we did. Lastly don’t forget to personalize your room. Put in decorations, inspirations, pictures and such.
Step 4: Most important! Sit in your new craft area. Look around, maybe work on a project. Do you feel comfortable? Do you feel crowded? Is it too dark, too bright? As you work on your project are you able to find what you need? Are your most used items close at hand? A small basket for often used items is a good idea, one with a handle so you can carry it with you or a tote bag so you can pick it up and go. If you don’t feel comfortable fix any issues that come up. It may take a few tries before you get it perfect but don’t get discouraged. You may even find that your needs will change as you grow as a crafter. Just re-assess your needs and adjust accordingly.
I hope this helped you organize your thoughts for your craft room; don’t forget to put it in use. It won’t do any good if you don’t actually do it. Tune in same day next week to see how our room is organized.